Table of Contents
Lab 12 - Path Planning and Execution
This lab focuses on having the robot execute a pre-defined path through a local environment of obstacles. The lab combines components from nearly every lab throughout the semester. Labs 1-4, which focused on sensor fusion and motor control, are used in this lab by having the robot interpret its surroundings (sensors) and move (motors). Labs 5-7 expanded on these individual components by implementing PID control and Kalman Filtering. Since I was gravely ill with the flu, I did not complete Lab 7, but I am sure it would be quite useful for this lab. Labs 9-11 focused on having the robot map its environment and determine its pose within a local map. Lab 12 combines features from all of these labs to implment autonomous path planning and traversal capabilities on the robot. The only lab that isn't used in Lab 12 would be Lab 8, as stunts are not necessary for efficient path traversal. However, it would be cool if the robot performed flips and drifts as it traverses through its environment, but that is beyond the scope of this lab.
Path Traversal and Local Environment
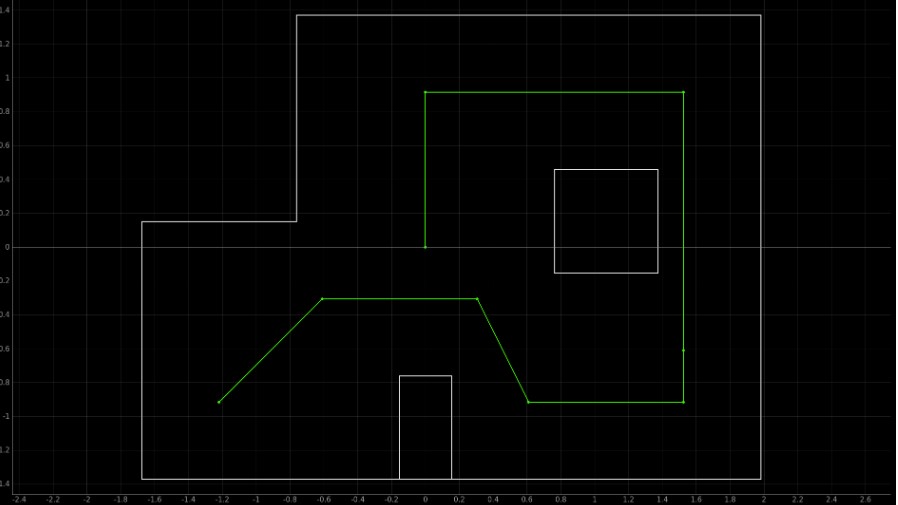
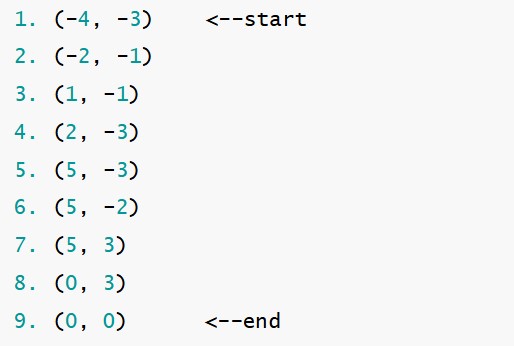
For this lab, the robot exists in the same world that it did for Lab 11. Within this world, the robot must traverse between a set of predetermined waypoints in the most efficient manner possible. A map of the world and the desired path is shown below, along with a list of the waypoints the robot must reach:
Design Process and Encountered Errors
For this lab, I chose to use Position and Orientation PID control to move the robot through the desired path. I had a very busy end of the semester, so I did not choose to implement a global or local path planning algorithm, such as the Bug Algorithm. I also did not choose to use localization for this lab. While initially I hoped to include localization, I found that my robot's traversal was very susceptible to errors in its orientation, and performing multiple localization observation loops caused these errors to increase. If the robot began forward motion at an angle slightly off from its expected angle, this error would propogate throughout the rest of the traversal, causing the robot to steer off of the desired path and potentially hit an obstacle.
Additionally, I noticed that my robot was susceptible to slight drifts during its forward motion. It would drift differently depending on the floor conditions and current battery level. With this drift error occuring, the robot also steered off course when it executed forward motion over large distances. This angle error was already a challenge to overcome, and adding more turns via localization seemed it would only make things worse.
If my robot was capable of more precise movement, I would've loved to implement localization. If my robot can detect its current pose at each waypoint, it could then calculate how to correct its trajectory based on its current position. However, I also noticed that any errors that did occur by using only PID were not significant enough to send the robot drastically off course. Each error would at most cause the robot to move one tile grid away from its desired location, and since my localization performance was susceptible to errors within one square of its actual position (see lab 11), I decided that localization all together would be too much of a hassle without much (if any) improvement to the robot's performance. With that, I decided to stick with a robust PID control of both position and orientation and continue with the lab.
Implementation
My path traversal works as follows. I use one front facing TOF sensor to execute PID control until the robot is at a desired position from the wall in front of it. Each tile grid is 304mm by 304mm, so I used this as a base number for how far away the robot should be from each wall.
I changed the path shown above slightly. When testing my robot with position PID control, I found that if the wall being used for TOF sensor measurements was not orthogonal to the robot, the TOF sensor was very susceptible to inaccuracies. For example, this occurs when moving from waypoint 1 to 2, as well as from 3 to 4. So, I adjusted the path of my robot to move only at right angles so that the robot was always oriented with one of the axes of the its environment.

When the robot reached each waypoint, the center of the robot should ideally be in the center of the tile grid. So I had to account for the distance of the TOF sensor from the edge of each tile given that the robot was in the center of the tile. Additionally, the theoretical calculated distance didn't always prove to produce the most accurate physical results, so I had to tune the robot based on its physical performance. This allowed the robot to perform better in the physical world, even if its PID setpoints differed from what they should be in theory.
Additionally, I used orientation PID control to turn my robot. Each turn was always a 90 degree turn, either left or right. The direction of the turn was determined based on what wall I wanted to use for my position control. Both of my TOF sensors were glued to my robot, and I was worried that removing them would damage them, so I designed my turns so that the front of the robot (with both sensors) was always facing the desired direction. I also found that my position control performed better at larger distances from a wall, so I chose to have my robot execute each forward motion by moving away from the wall it was using for TOF sensor measurements. For example, when moving from waypoint 6 to 7, I had my TOF sensors facing the wall at the bottom of the map instead of the top of the map.
I implemented two bluetooth commands, MOVE_FORWARD and TURN_CCW. I originally planned to have a third command for turning clockwise, but I figured out I could just send negative angle measurements to the counter clockwise command and the robot would turn in the desired location. Shown below is the Python side of the traversal. The values sent for each command were determined by calculating the theoretical distance from each wall and then tuning based on the robot's physical performance. Likewise, telling the robot to "turn 90 degrees" didn't always result in a perfect 90 degree turn, so some of the orientation control commands use angles slightly offset from 90 degrees in order to boost performance.
# waypoint 1 to 2
ble.send_command(CMD.LAB12_MOVE_FORWARD,"444")
ble.send_command(CMD.LAB12_TURN_CCW, "88")
ble.send_command(CMD.LAB12_MOVE_FORWARD,"912")
# waypoint 2 to 3
ble.send_command(CMD.LAB12_MOVE_FORWARD,"1824")
# waypoint 3 to 4
ble.send_command(CMD.LAB12_MOVE_FORWARD,"2228")
ble.send_command(CMD.LAB12_TURN_CCW, "90")
ble.send_command(CMD.LAB12_MOVE_FORWARD,"364")
# waypoint 4 to 5
ble.send_command(CMD.LAB12_TURN_CCW, "87")
ble.send_command(CMD.LAB12_MOVE_FORWARD,"344")
# waypoint 5 to 6
ble.send_command(CMD.LAB12_TURN_CCW, "-90")
ble.send_command(CMD.LAB12_MOVE_FORWARD,"758")
# waypoint 6 to 7
ble.send_command(CMD.LAB12_MOVE_FORWARD,"1128")
ble.send_command(CMD.LAB12_TURN_CCW, "3")
ble.send_command(CMD.LAB12_MOVE_FORWARD,"2128")
# waypoint 7 to 8
ble.send_command(CMD.LAB12_TURN_CCW, "92")
ble.send_command(CMD.LAB12_MOVE_FORWARD,"1008")
ble.send_command(CMD.LAB12_TURN_CCW, "5")
ble.send_command(CMD.LAB12_MOVE_FORWARD,"2008")
# waypoint 8 to 9
ble.send_command(CMD.LAB12_TURN_CCW, "95")
ble.send_command(CMD.LAB12_MOVE_FORWARD,"1420")
I also noticed, as previously mentioned, that my robot was susceptible to drifting when executing long forward motions. So for these stretches, I had my robot move part of the way, adjust its orientation, and then continue moving. A more sophisticated solution would have the robot use the IMU to calculate its current orientation and how much it differs from the desired orientation more periodcally, but this implementation worked well enough.
The PID Position and Orientation control functions were implemented on the Arduino side of the robot. A specific analysis of these functions can be found in Labs 5 and 6 respectively.
case LAB12_MOVE_FORWARD:{
    int currDist;
    int targetDist;
    float dist_error = 10;
    float curr_error;
    success = robot_cmd.get_next_value(targetDist);
    if (!success) {
    return;
    }
    distanceSensor1.startRanging();
    do{
        while(!distanceSensor1.checkForDataReady()){

        }
        currDist = distanceSensor1.getDistance();
        distanceSensor1.clearInterrupt();
        curr_error = runPIDPositionControl(currDist, targetDist);
    }while(abs(curr_error) > dist_error);
    stop_motors();
    distanceSensor1.stopRanging();
    delay(1000);
    break;
}

case LAB12_TURN_CCW:{
    float targetYaw;
    success = robot_cmd.get_next_value(targetYaw);
    if (!success) {
        return;
    }
    float angle_error = 2;
    init_PID_yaw();
    measure_DMP_data();
    float currYaw = DMP_YAW;
    PIDYAW_SETPOINT = currYaw + targetYaw;
    if(PIDYAW_SETPOINT > 180){
        PIDYAW_SETPOINT -= 360;
    }
    myICM.resetFIFO();
    do{
        runPIDOrientationControl();
    }while(abs(PIDYAW_ERROR) > angle_error);
    stop_motors();
    delay(1000);

    break;
}
Shown here are the implementations for the MOVE_FORWARD and TURN_CCW commands on the Arduino side. As seen above, the PID control would continue executing until the robot's error from its desired position was below a certain threshold. This sometimes caused the robot to get stuck, as seen in the videos below. A more robust solution would include another condition for the while loop that allows the robot to continue executing its traversal to the next waypoint after a set amount of time has passed.
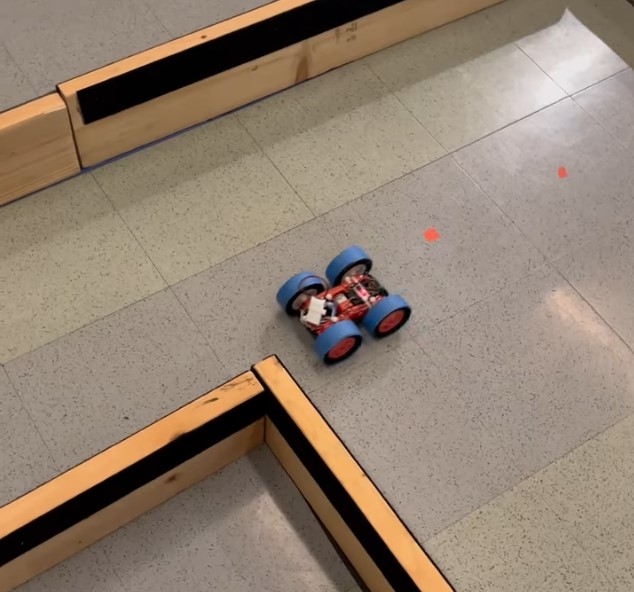
Results
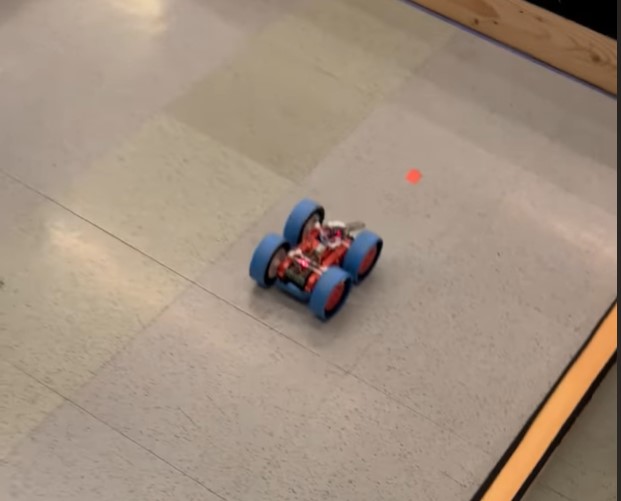
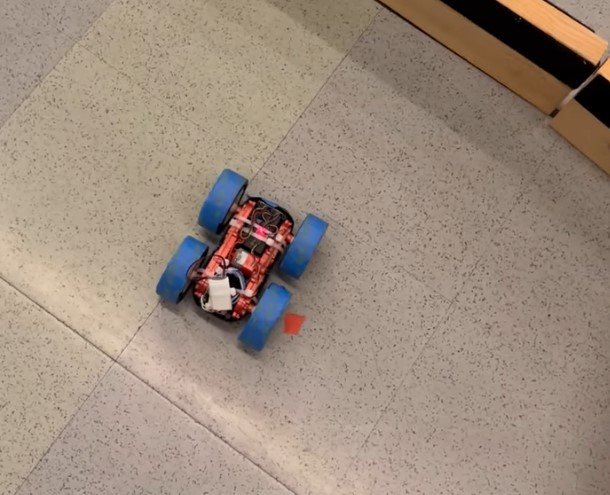
Shown below are videos of the three best trials for my robot's traversal. The robot performs quite well, but the previously mentioned errors of forward motion drift and PID error detection due sometimes occur. However, the robot still performs quite well and is able to traverse to each waypoint with sufficient accuracy.
Conclusion and Acknowledgements
Overall, this lab was quite fun to complete. I enjoyed working the robot and seeing it successfully move through a path and avoid obstacles. It was a very satisfying conclusion to this class. I learned a lot while working on these labs, and have developed a new appreciation for the field of robotics -- something that I had very little prior experience with. While completing this lab, I referenced Bhadra Bejoy's 2023 webpage and Daria Kot's 2024 webpage. I also talked with other students who were using the world environment at the same time as myself about how they were going about implementing their solution for the lab. I would like to thank all of the course staff and Professor Helbing for a great semester. I would not have been able to complete this class without all of your help. While this class was very difficult, I learned a lot and it was very rewarding being able to create a working, physical robot!